Hello beautiful people! Welcome back to Crislus’ Beauty Secrets, today I’m sharing my skincare routine with you, step by step.
I would like to start pointing out that my skin is not the best (also not the worst), it’s really just regular skin with texture and imperfections, which is NORMAL. Please, do not try to compare yourselves with whatever you see in videos or social media posts because it’s all fake (although we all know this person, blessed by genetics and skincare gods, who has no pores and washes their face with shower gel).
Secondly, I would like to warn you from the start, my routine is not fancy, it doesn’t have 48 steps, it doesn’t take 3 hours and you don’t need weird devices. It’s just plain and effective, and recommended by my dermatologist.
STEP NUMBER 1:
First things first, you need to wash your face. It doesn’t matter if you use make up or not, skin has buildup of oil, dead skin cells and many other substances that you should be removing in order to achieve your best skin possible, so first step is SOAP.
If you’re using make up, you need to remove it first, the best thing you can use is a cleansing balm, I highly recommend Clinique. You just take a small portion, rub it on your face, rinse and it will melt anything you have put on your face. It works specially well with waterproof mascara and it does not irritate the eyes.

After the cleansing balm, or if you don’t have any make up on, it’s time for a cleanser. Make sure it’s gentle and that it matches your skin type. I have combination-dry skin, so my recommendation may not be suitable for you and your needs. This one from Sephora Collection is a great choice if you want to buy quality skincare on a budget.

STEP NUMBER 2:
Glycolics, toners, rose water. Does it ring a bell?
This is the time to spray or rub a nice toner on your skin, I highly recommend using rose water, as this is an astringent product. What does this mean? I got you. Astringents help to tighten and shrink the appearance of pores, while cleansing the skin and removing any excess oiliness. This is the last step of the cleaning part. I will not recommend any certain rose water because most of them are good, my tip is just to check that it doesn’t contain too many ingredients.
Rose water can be used either during day or nighttime, as it does not contain any imcompatible ingredients with the rest of your skincare.
During the night, I prefer to use a glycolic acid toner to promote the exfoliation of my skin. My favourite one is The Inkey List, I apply it with a cotton pad and rub it on my skin, always in an ascending motion, as this will help with thin lines. PLEASE, remember glycolic acid is not to be used during daytime, as it causes photosensitivity.

STEP NUMBER 3:
Time for serums!
I like to keep it simple in this aspect, I use a vitamine C serum in the morning after my rose water toner and that’s it. The best one is definitely by Skinceuticals, but it is also extremely pricey for a person with a normal salary. My recommendation is Kueshi Glow Juice. It has an amazing texture that you can apply with your hands or even with a gua sha if you’re into face yoga. It’s very nourishing and gentle on the skin and definitely worth a try.
IMPORTANT:
- Do not touch your face with the applicator, apply it on your hands and then rub it on your skin in ascending motions.
- Do not use it during the night, vitamine C is to be applied in daytime.
- ALWAYS use an SPF.

STEP NUMBER 4:
Welcome to the world of moisturizers, there is a lot to talk about here. Firstly, let’s chat about eye contour. I am currently using Chanel N1 eye cream (creme revitalisante au camelia rouge), it has an amazing formulation and keeps my eyes fresh and bloat-free. I struggle a lot with undereye bloating and bags so I also decided to add, once or twice a week, some eye patches to help depuff.

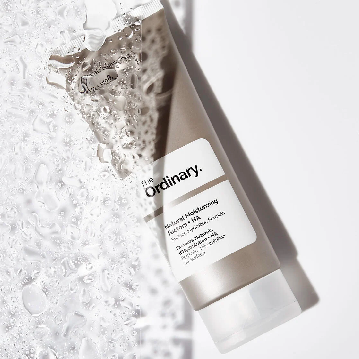
In terms of face creams… I have tried too many. On the same line as the eye contour, there is the Chanel N1 face cream, also with a great formulation, but I find it too pricey for the results it gives. I have recently started using the Ordinary Natural Moisturizing Factors + HA and it’s great! It does the job, my skin feels amazing and it’s not too creamy or fatty on me. Sometimes I have to do some extra massaging on the sides of my nose but that’s just me and my allergies hanging out together.

STEP NUMBER 5 (FINALLY):
We’ve reached the end, congrats. If you’re like my boyfriend, you will think this is too much and you’ve probably stopped reading by step number 3. If you’re here, though, u da real one. Don’t worry, the last step is very simple, it’s SPF.
When we talk about sun protections, we need to understand that it’s not only about making it match with our skin type or intention to stay in the sun for a longer or shorter period (I wish it was that easy), we also need to find a product that matches our MAKE-UP. If you don’t wear make-up, consider yourself lucky.
It’s simpler than it looks like, all we need to do is identify if our foundation is water or silicone based and then purchase an SPF that has the same base, sorry about scaring you before, I wanted to create some expectations for such an easy thing.
I am currently using an SPF that I bought in India by a brand named Kama Ayurveda. They use natural ingredients, their prices are mid range (around 17 EUR for an SPF) and I’m very happy with the results. Apart from protecting me, it’s making my skin look better.

And that’s it!! Thank you for reading so far and I look forward to see you on the next post!
Kisses!!!


Leave a Reply